Introduce
We are pleased to welcome you to the user guide of the Change Manager app. Thank you for your interest in our application, which is defined by the IATF (International Automotive Task Force). implements change management procedures in digital form according to the principles of 6M, thus offering a modern, efficient and environmentally friendly alternative to traditional paper-based solutions. Digital document management has many advantages compared to paper-based systems:
- Accessibility and convenience: Digital documents can be accessed from anywhere and at any time, with the help of an Internet connection. This enables faster and more efficient work and provides immediate access to the necessary information.
- Environmental protection: Paper-based documentation represents a significant environmental burden due to printing and paper use. With our digital solution, we reduce this burden, thereby contributing to sustainability.
- Security and data protection: Digital documents are easier to protect against unauthorized access and can be better managed in accordance with data protection regulations. It also makes backups and data recovery easier.
- Simplified process management: Tracking, approving and documenting changes is simpler and more transparent on the digital platform. This improves communication and reduces the potential for human error.
- Scalability and flexibility: Digital systems can be easily expanded and adapted to the growing needs of the company, enabling solutions tailored to individual needs.
App operation mechanism
The diagram below shows the working mechanism of the app, let's review this as a start.
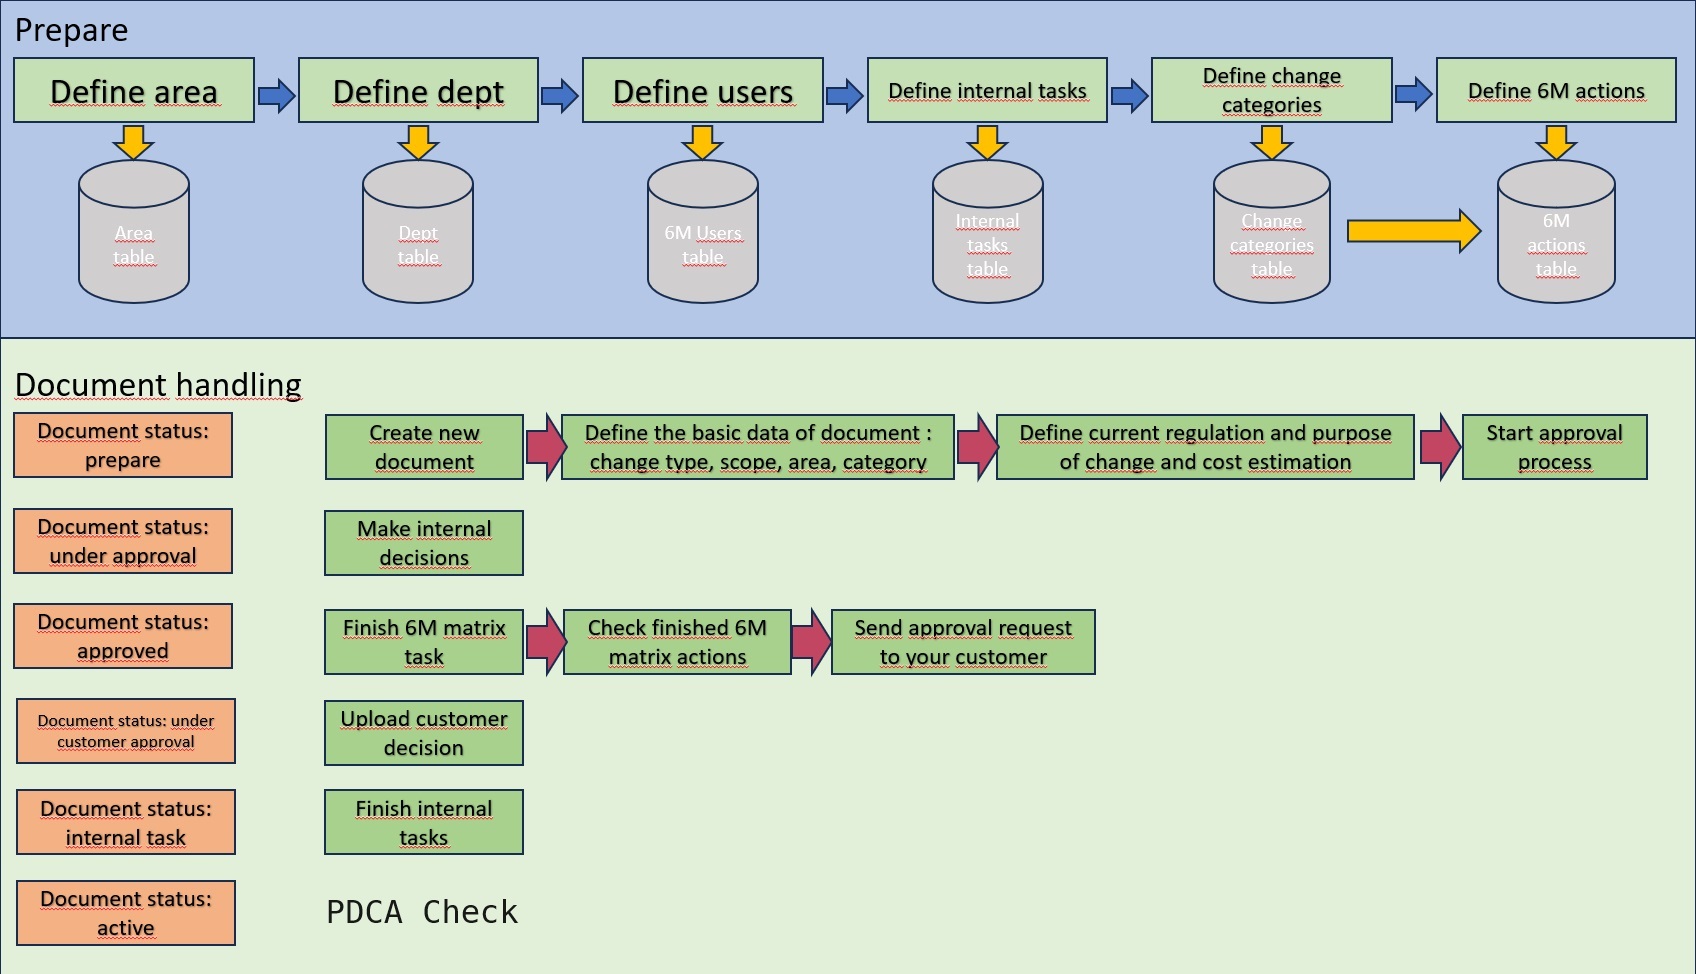
The first step is to make the necessary settings for the operation of the app. These data will control the app, they are essential for correct operation. The setup steps are as follows:
- Defining areas. The areas within the company where we want to apply change management must be defined.
- Definition of organizations. The organizations that we want to involve in change management must be defined.
- Defining users. It must be determined which users have decision-making and administrative rights, and who makes the final decision. Only one user per area can have final decision-making authority.
- Definition of internal tasks. The tasks that are not included in the tasks defined by the 6M matrix, but are necessary for the introduction of the change, must be defined.
- Structure of change categories. All possible changes must be assigned to a change category. Tasks defined by APQP can be assigned to these change categories.
- Definition of 6M matrix. What actions must be taken to introduce the change must be assigned to the change category.

When starting a new document, the type of change, the scope of the change, the affected area and the category of the change must be defined. The system will generate task lists and decision lists a based on settings. The list of the internal decision process is generated from the user's settings table. Whoever is assigned to the affected area here can make a decision. The task list of the 6M matrix actions can be found in the 6M the system is built from data defined in the actions table, while the internal task list will be generated from the internal tasks table. The picture below shows the task list of a document.

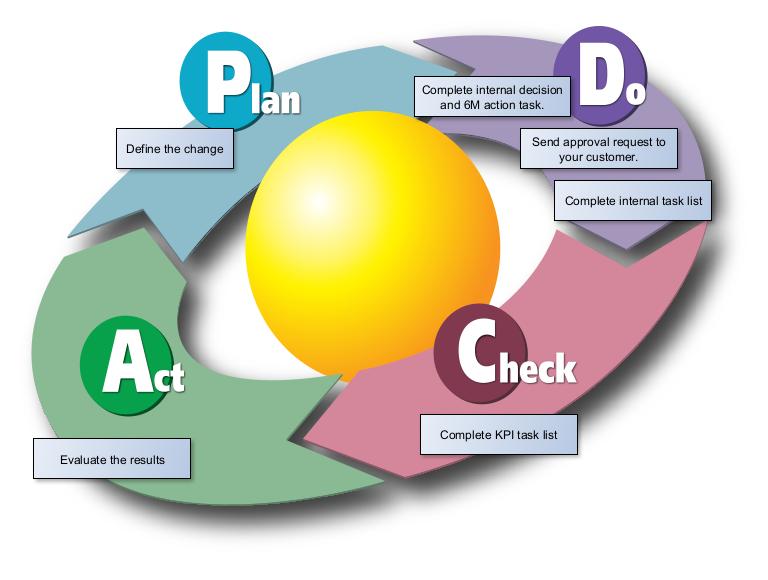
After the applicant has filled in the basic data and determined the subject of the change, he can start the decision process. Steps of the decision process:
- The first step is to carry out the internal decision process.
- The second step is to perform the tasks defined on the basis of the 6M matrix and upload the evidence.
- The third step is to check the tasks defined by the 6M matrix.
- Step Four is to send the customer approval request to the customer, if necessary.
- The fifth step is to perform the tasks specified in the internal task list.
- After the above, the document will have a live, i.e. active, status.
- After the introduction, only the PDCA check remains. In this process, the effectiveness of the introduced change must be checked.
Setup
The app is recommended to be installed by users who deal with change management and the administration of this app. During the first installation, the installer performs the following actions automatically:
- Registers the user performing the installation as an administrator among the users.
- Creates a numbering series called CHGM to serialize documents
- Sets this numbering series as the document numbering circle
- Sets the maximum validity of a temporary document to 90 days
- To the items in the task queue, add the task that controls the execution of the codeunit that performs the required scheduled tasks. This will be suspended by default and will need to be restarted manually, see you later.
Change request setup
General setup
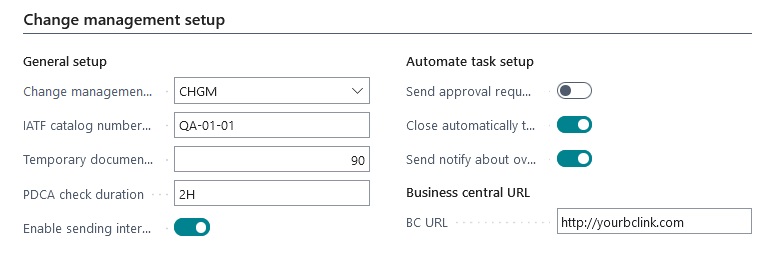
With the exception of the IATF catalog number, these are set by the system during installation, if you want to change them, you can do so here. You must enter the IATF catalog number. You have the option to turn off internal mail by turning off the "Enable internal mail" switch. In this case, the system will not send notification letters. This setting does not apply to letters of approval requests to be sent to the customer it must be sent from the app. This is because the system needs to manage background settings and know whether the customer approval request has been sent.
By setting the "temporary document validity" field, the expiration time of temporary documents can be controlled, the value must be entered in days. "Duration of PDCA control" denotes the period during which the effectiveness of the introduced change must be checked. Based on the date formula set here, the system calculates the deadline available for the PDCA check. This date is calculated when the document is placed in active status.
Automated task setup
By turning on the "automatic sending of approval request", the system will automatically send the
notification letter about the change to the customer.
If you turn this off, you can send the approval request to the customer by selecting a menu item.
At the bottom of the customer card, there is a field where the email addresses to which the change request
should be sent must be set.

By turning on "Send notification of expired temporary documents", the system sends a notification to all users who in the change management user setup is registered in case there is a temporary document that has expired. This notification will be sent out every Monday morning. If you want to change this setting, you can do so in the task queue items.
Business central URL
The link set here will be added to the notification letters.
Email settings - Customer approval request
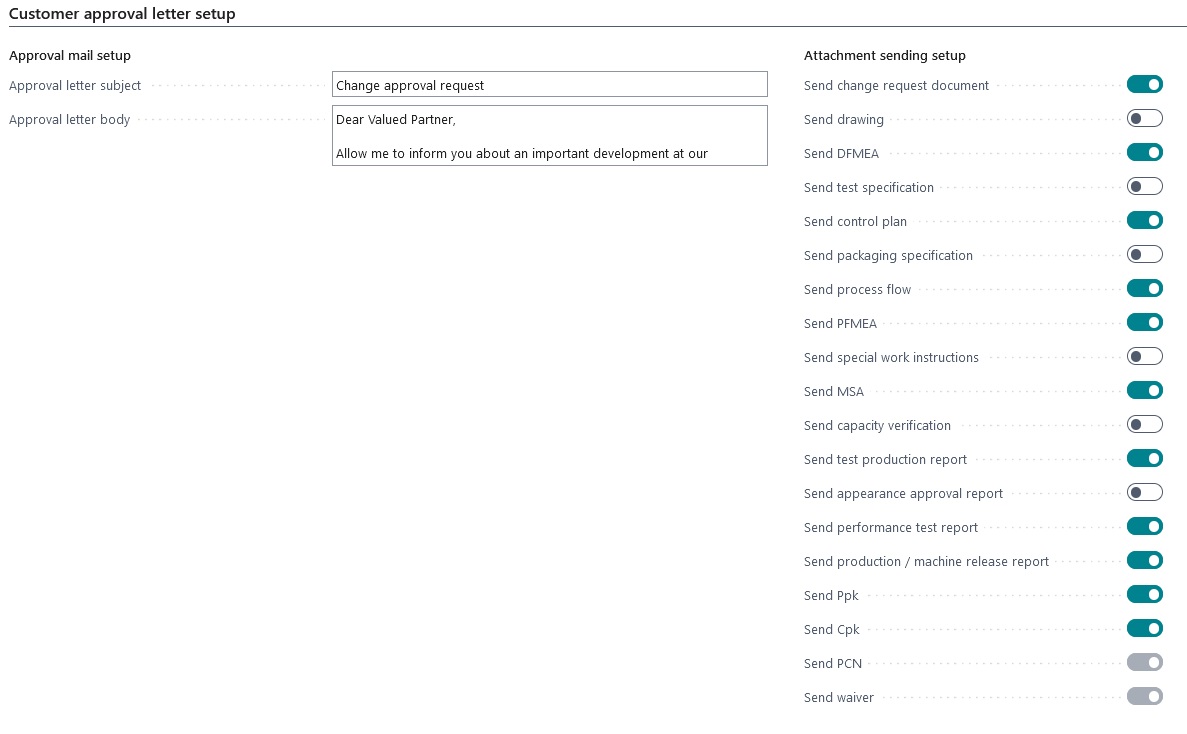
Here you can set the subject and body of the letter in which we notify the customer of the change. It is recommended to review this and make the appropriate adjustments. In the attachment settings section, you can control which uploaded documents are sent to the customer with the change notification. (The PCN and the Waiver will be sent out in all cases, as the buyer must be notified on these.) By turning on "Send change request document", the change request document will also be sent to the customer, this document is the one created by executing the Reports -> Print document menu.
Email settings - Internal notification mails

In this section, you can configure the subject and text of emails for internal use of the system. After installation, it is also advisable to make the bends here.
Substitution of document data in internal letters
It is possible to replace some data of the document in the text of the letters in such a way that if you use
the expression %n in the "body of the letter" part, where n is an integer between 1 and 9, then the
following document data can be placed in the letters:
- %1 -> Document number
- %2 -> Request by
- %3 -> BC login page
- %4 -> Area
- %5 -> Item number
- %6 -> Machine center
- %7 -> Duration of temporary document
- %8 -> Number of production orders
- %9 -> Customer name
Application examples

Setup menu system

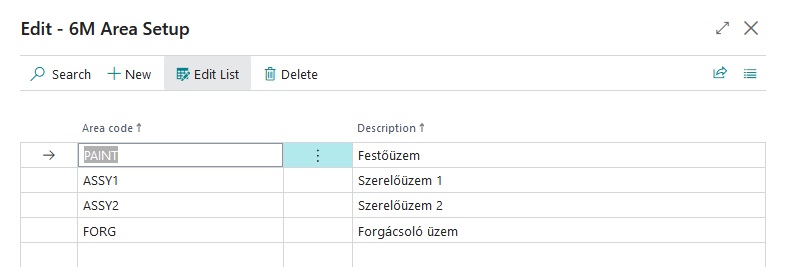
Area setup
It can be used to define the production sub-units, for example assembly line, painting plant, cutting plant, etc. The area code must consist of a maximum of 10 characters, the description can be 50 characters.
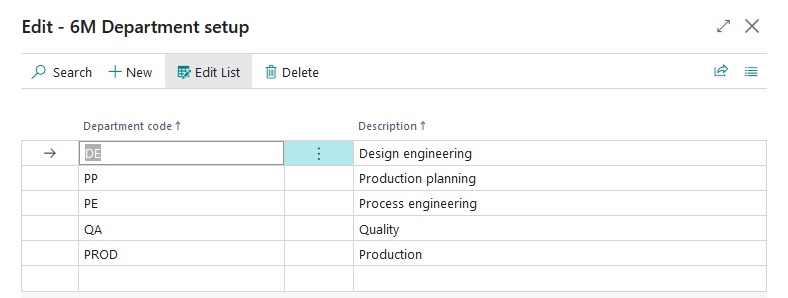
Department setup
It can be used to define organizational units, such as production, product planning, process planning, maintenance, etc. The code of the organization must consist of a maximum of 10 characters, it can only contain letters, the description can be 50 characters.
User setup
It can be used to define the users who have decision-making and/or administrative rights.
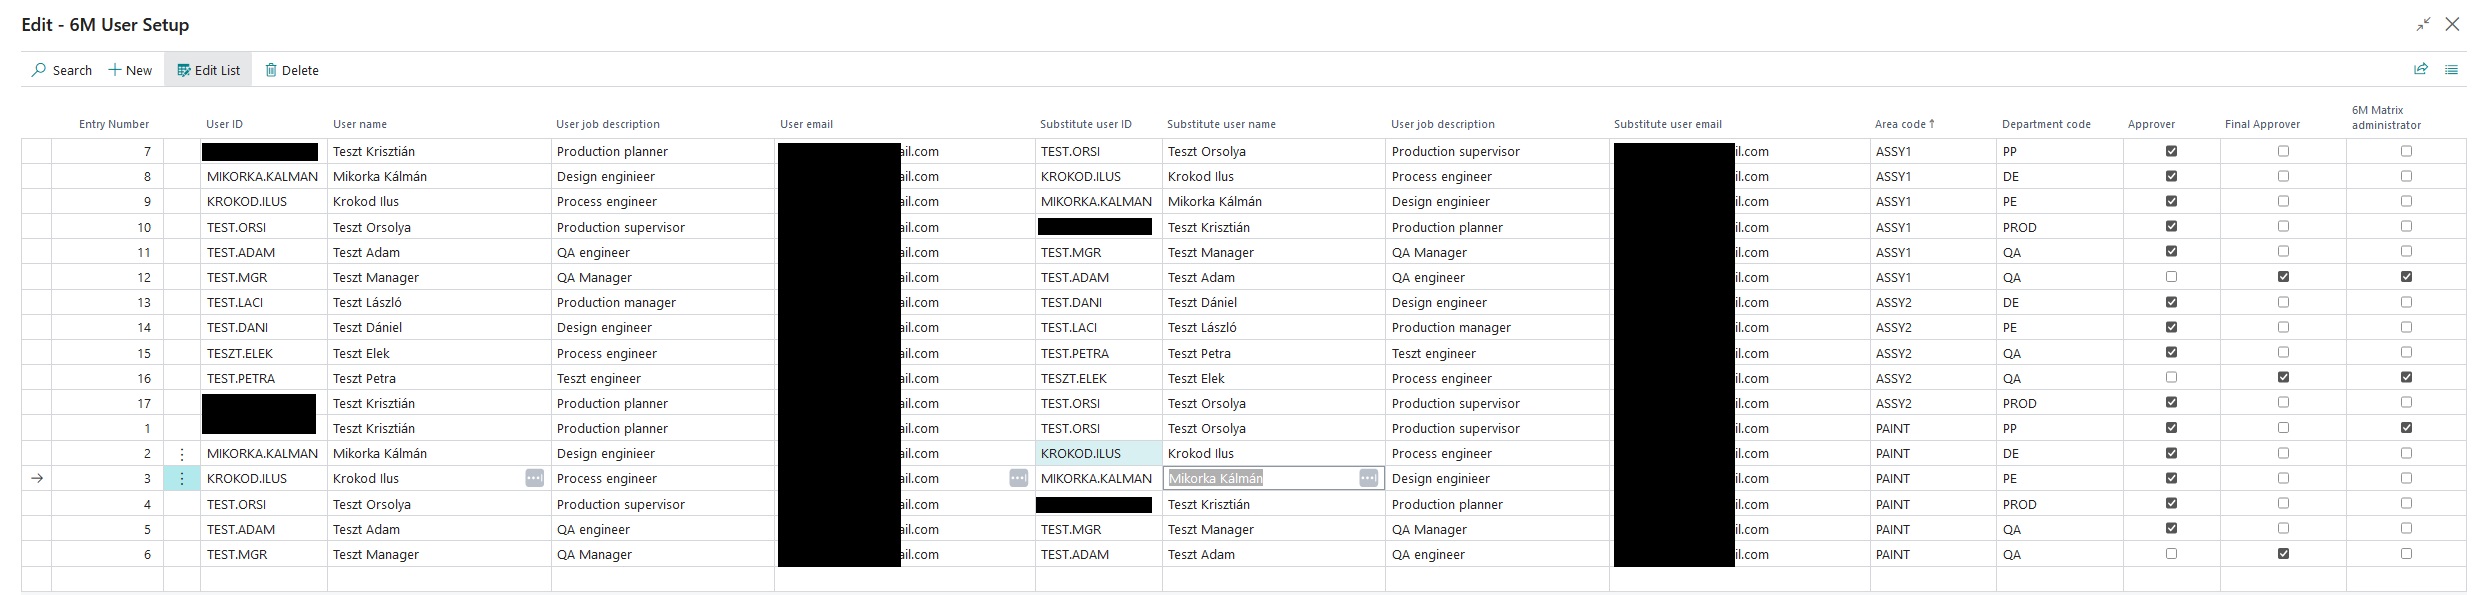
The users who will have decision-making rights and the manager (one per area) who will be the final decision-maker must be defined here. The app is structured in such a way that each person listed here must make a decision in relation to the document by area, this will be the basis of the "internal decision list". A substitute user must also be set up for everyone. The surrogate user has the right to make decisions on behalf of the user he is replacing. The users' email addresses must also be entered, because this is where the system's notification letters will go. Limitations:
- Only one final decision-maker can be specified per area
- The same user can appear only once within the same area and organization
If the user has final decision-making authority, the final decision-making box must be unchecked.
If the user has administrative rights, the 6M matrix administrator check box must be unchecked. This privilege allows you to edit settings, task lists and the 6M matrix.
If you want to delete a user, you can do so with the delete button.
Define internal tasks

Here you must define the tasks that are not included in the tasks defined by the 6M matrix, but are necessary
for the document to be in active status.
This could include, for example, updating production orders when a material or operation changes. These
tasks must be performed after the customer's acceptance has been received
to a worker who is set as responsible. Tasks must be grouped by area and organization. These tasks will
appear in the last part of the change request sheet,
and will only be available if customer approval has been obtained or customer approval is not required.
In the "description of the task" section, the task must be formulated, the area to which the task belongs,
the responsible organization and who is responsible for completing the task must be set
authorized person.
A date formula can be entered in the "task duration" section, which will determine
the deadline for the task. It is recommended to define all tasks that
may occur during the process. These tasks can be deleted on the main page of the change requester if a
specific task is not relevant to the change.
KPI registration
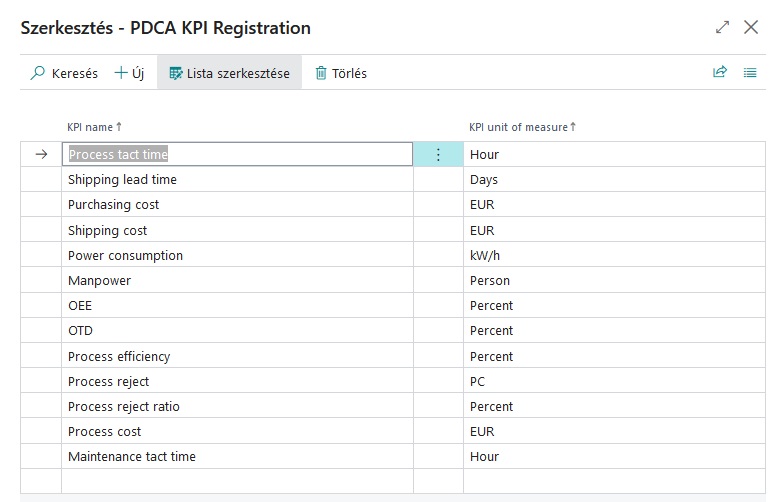
Here it is possible to record the KPIs with which you can check the effectiveness of the implemented change after the change has been introduced.
Demo data generating
Since the setup of the application can take a long time, it is possible to insert demo data using the
"Generate demo data" button, in which some change categories, organizations, areas and matrix actions are
defined. This feature is only available in the demo version of the app.
Delete data
This function deletes all data from the following tables. This feature is only available in the demo version of the app.
- Change Requests
- Internal task lists
- Decision list
- Matrix action list
- PDCA action list
Be careful when using it, because deleted data cannot be recovered.
License key import
You can import the license key here. The key is a text file with the extension .lic that identifies the
period you subscribed to.
After installation, the app works in demo mode, and only 50 change requests can be made with it. There is no
time limit. To make the app live
subscription is required to use it. In the case of a subscription, there are no restrictions on any
operation. In the event that your subscription has expired and is not reactivated
the app can edit and read documents created up to that point, i.e. if something is not completed, the
process can be carried through, but new
you can no longer start a request until the subscription is extended. If you are not yet a subscriber but
would like to be, you need one
for a software delivery agreement that includes the terms of use. We will send you the contract, which must
be signed and returned to us. After signing, we will send the
key and the invoice, from here on the app can be used without restrictions. If there is an agreement, please
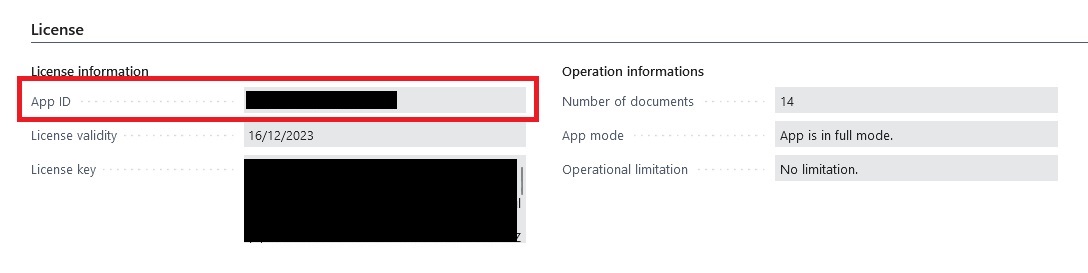
send us the appID, failing that
we can't make the key. You can find this under the "license" section of the settings. (Red frame in the
picture below)
Before activation, we recommend that you delete the data used for testing because this function is not available in the activated app.
Tasks after installation
After installation, the user must perform the following tasks:
- The app task queue item must be started, otherwise the automated tasks will not run.
- Check if Business Central is configured to send mail.
Checking Task Queue Items
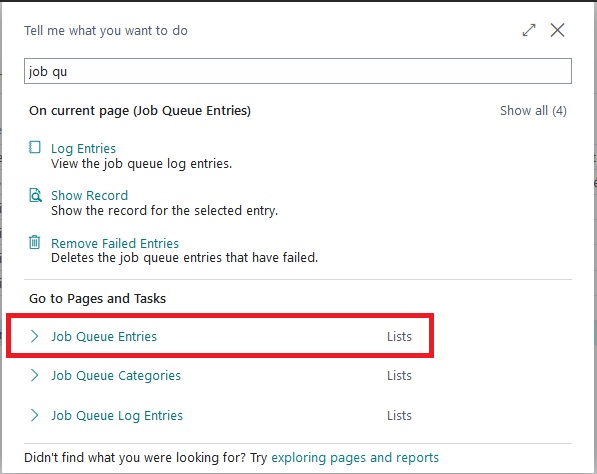
In the BC search box, type "task queue items" and then start the task manager.
After launch, you should see something like:

Check whether the status of the entry called "change request task scheduler" is "ready", if not, go to the cardboard and press the restart button in the menu above. If the status is ready, then it is fine.
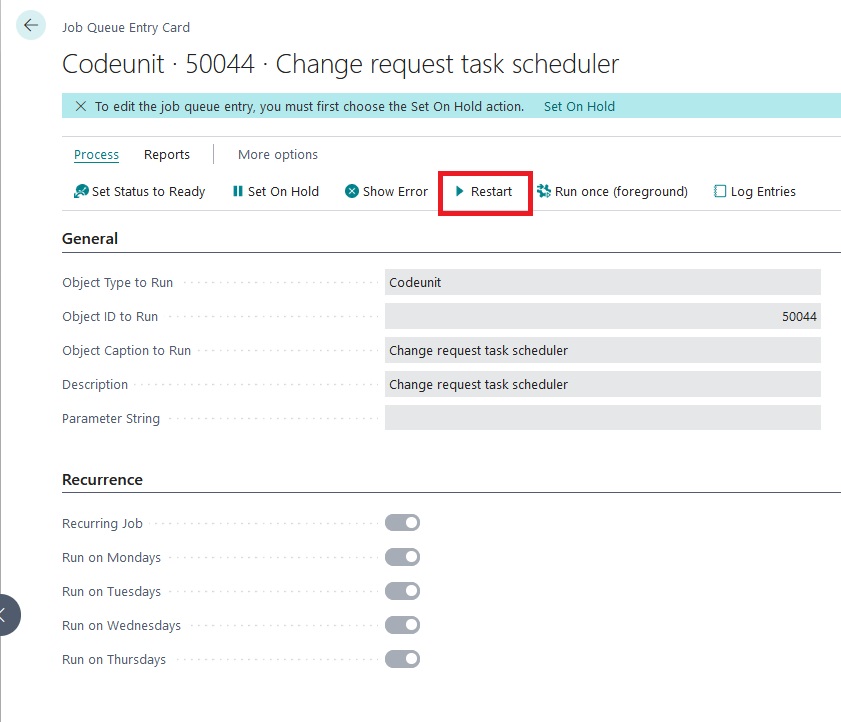
This task runs every day at 6 AM and checks the system for expired temporary documents and performs its task based on the settings discussed above. If you want to change the dates, you can do so here, but first you have to set the task to "on hold", because it will only be editable then. If you have made the appropriate settings, such a task must be restarted.
Check BC mail settings
If sending emails from the app is enabled, an email account for sending emails needs to be configured in Business Central. This can be done by entering "email accounts" in the search field can be checked. If nothing is set on the page, ask the administrator for help to set it up.
Document management
Starting the app, overview of the home screen
After installation, enter the keywords "change management" in the search field. Two results will appear, we need the list view. It is advisable to bookmark this. No additional pages are required to note names, because all functions are available from here through the menu system of the app.

Overview of the list view

The list view shows the basic data of the created documents. You can open the document by clicking on the document number. Filters using the buttons framed in red can be done on the status of the document. The following menu items are available in the "actions" menu section (green frame):
- 6M matrix group, here are functions related to 6M matrix and change categories
- Tools group, the app settings can be accessed from here
- Reports group, from here you can access document printing and statistics
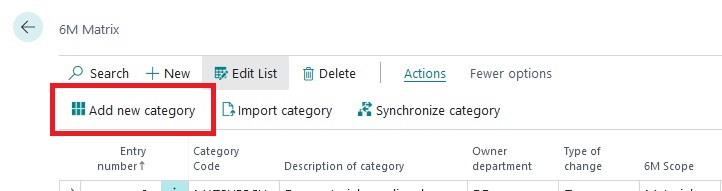
Management of change categories
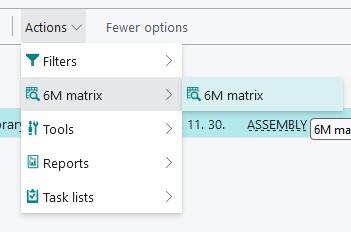
Start the 6M matrix with the menu below
The change category can be added by clicking on the "add new category" button.
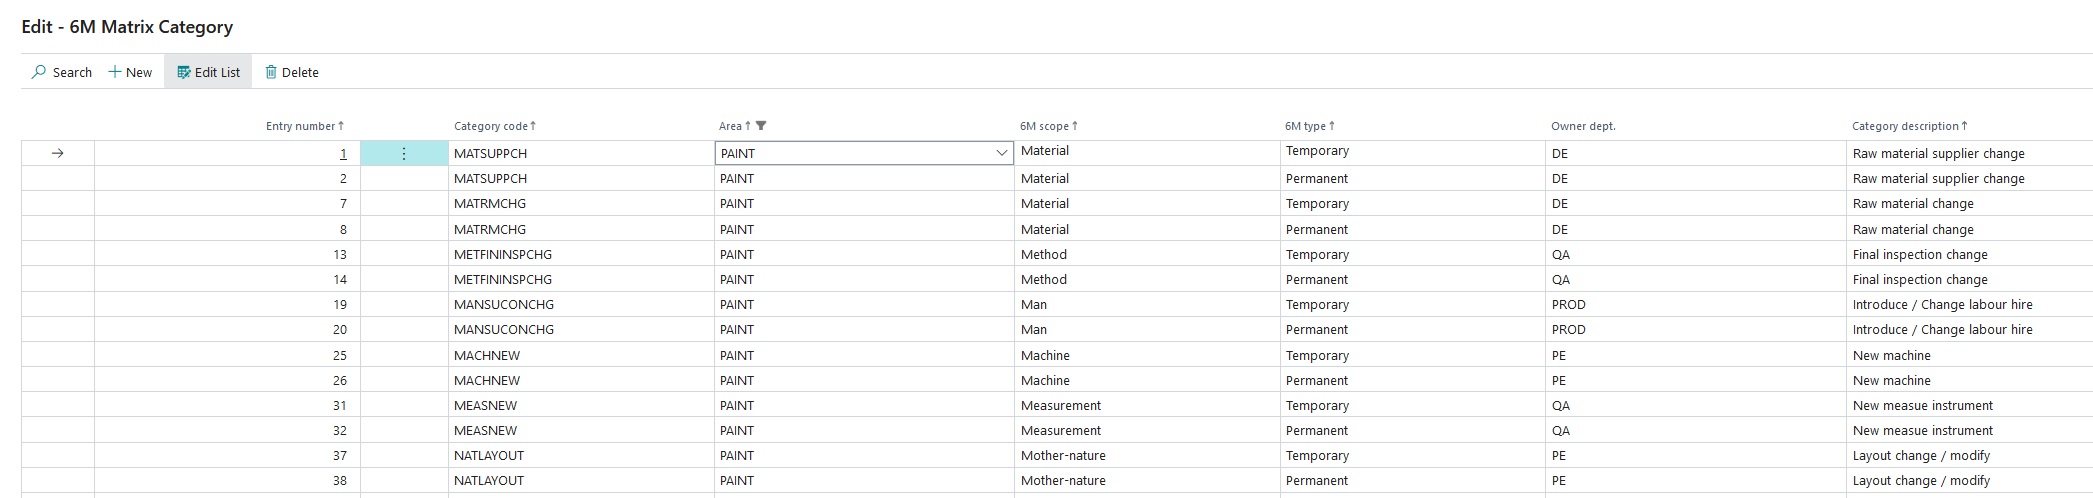
A new change category can be entered on the page that appears. Since the change request can be permanent or temporary, it is advisable to record the change category for both types. The category code is appropriate to build according to some logic. In the image below, for example, the first three characters of the category code represent the scope of the change, followed by the abbreviation of the category of the change itself. (MAT = material scope, SUPPCH = supplier change -> MATSUPPCH) A specific category code must be entered for each area. We recommend that you think carefully about the definition of the change categories, consult with your colleagues if necessary, because this list is the basis of the 6M matrix.
If you have the category codes, they must be imported into the 6M matrix so that we can assign the necessary tasks to them. Let's go back to the matrix form of the category by closing the page. At first launch, there will be no data here, so you have to import the categories. This can be done by pressing the "category import" button. (Red frame in the picture below) This function is everything data will be deleted from the matrix database.
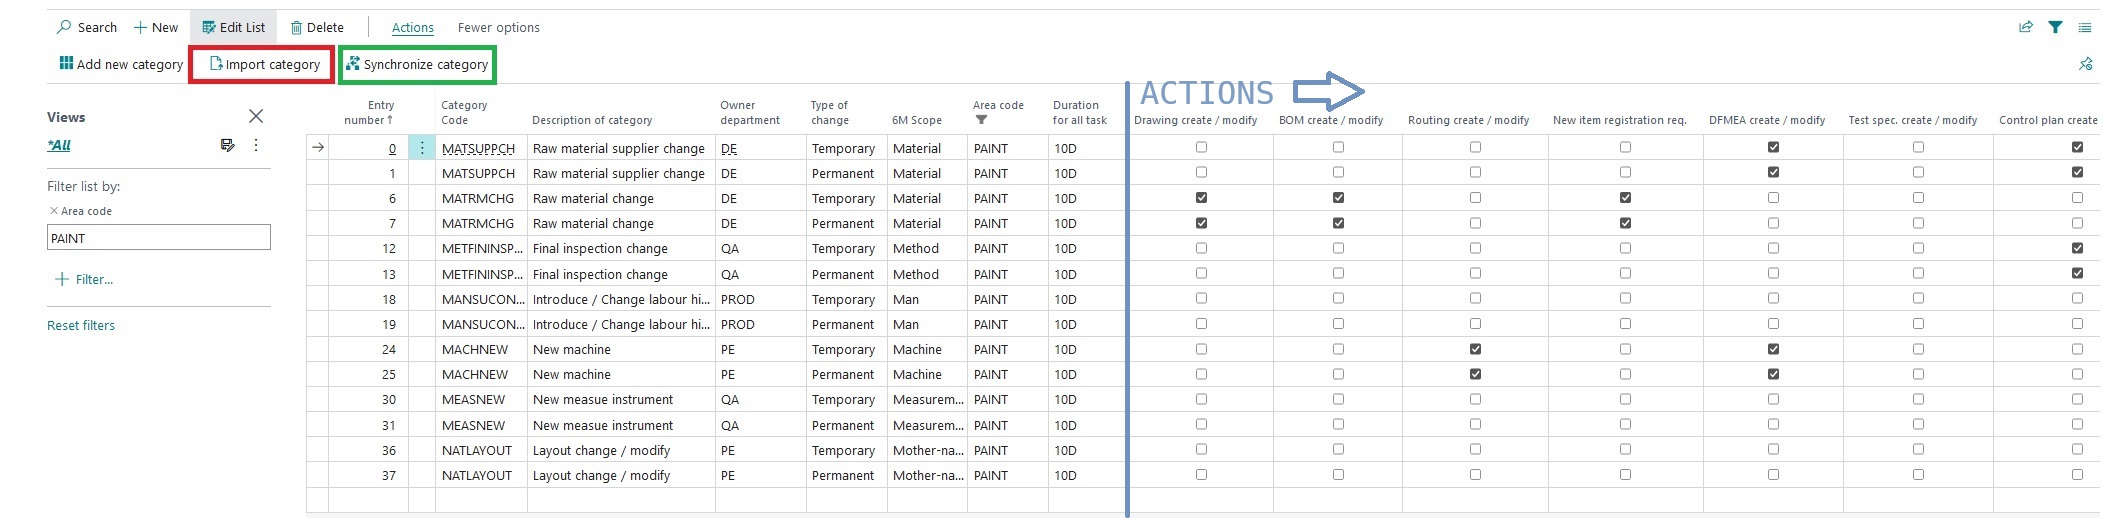
After importing, we should get a list similar to the image above, with the difference that no action is
assigned to any of the change categories.
The next step to be taken is to assign the necessary actions to each change category by ticking the
appropriate marker.
In the "duration of all tasks" column, enter a date formula for how long each task should be completed.
The system will take this value into account when calculating the deadline.
If you want to change, delete or add a new category, you can do so by selecting the "add category" button.
After modifying the categories, close the categories window and use the "synchronize categories" button
(green frame in the top image) on the main page of the matrix to
to perform synchronization. This will synchronize all data with the category database and this feature will
not delete existing data.
Once the appropriate actions have been assigned to each category, the system is ready for use. In the
following section, you will see the operation of the system through an example.
Create a new document
In the list view of the app, a new document can be created by pressing the "new" button. The page window can be divided into 9 parts.

- Basic data. The basic data of the change request document must be filled in here.
- Current regulations. This includes a description of the old regulation that we want to change.
- Description of the proposed change
- Cost implications. Here you can enter the estimated cost of the change.
- Internal decision. This list contains the users who belong to the specified area and have decision-making authority.
- Info panel. Provides information about the document.
- Actions based on the 6M matrix. This list contains the tasks assigned to the change category on the 6M matrix.
- Internal task list. This contains a list of tasks that are not defined in the 6M matrix but are required to implement the change.
- PDCA checklist. It will contain a KPI list defined in the settings, with the help of which you can check the effectiveness of the introduced change.
A new document must be started by filling in the basic data. The system will provide the document number automatically, we just need to exit the field. "Status" is a non-editable field, the system handles this according to the degree of completion of the document. The type of change can be temporary or permanent. If we initiate a temporary change, the duration must be specified, which can be a maximum of the number of days specified in the settings. "Area" is the code of the unit to which the change requester applies. This is the basis for compiling the internal decision list. The "category code" defines the category to which the initiated change belongs. This is the basis of the list of tasks shown in "actions based on the 6M matrix". The "scope", "applicant" and "creation" fields are handled automatically by the system. The value of the "scope" field depends on the category code you enter. The decision and task lists are built after leaving the "area" and "category code" fields, and their content depends on them. If the change is article specific, you can enter it in the "article number" field if it affects a production order, and then you can enter its number in the "production order" field. In the "description" field, you can write a comment about the document, if any. In the "Machine group" field, you can enter the number of the machine group affected by the change. Specifying the "customer name" is mandatory if the change requires customer approval, i.e. in the 6M matrix, a waiver or preparation of a PCN is marked for the given change category. The system automatically searches for the "customer article number" if we entered our own article number. Among the basic data, filling in the fields below is mandatory:
- Area
- Change category
- Customer name, if the change requires customer approval. (If not filled in, but required, the system will warn you.)
If we have filled in the basic data, the descriptions of the change and the cost implications must be entered. The cost implication is intended to show how much the change will cost in excess / cost savings per unit of the product. If you enter a negative number, it means cost savings, if you enter a positive number, it means additional costs. You should see something similar to the image below:
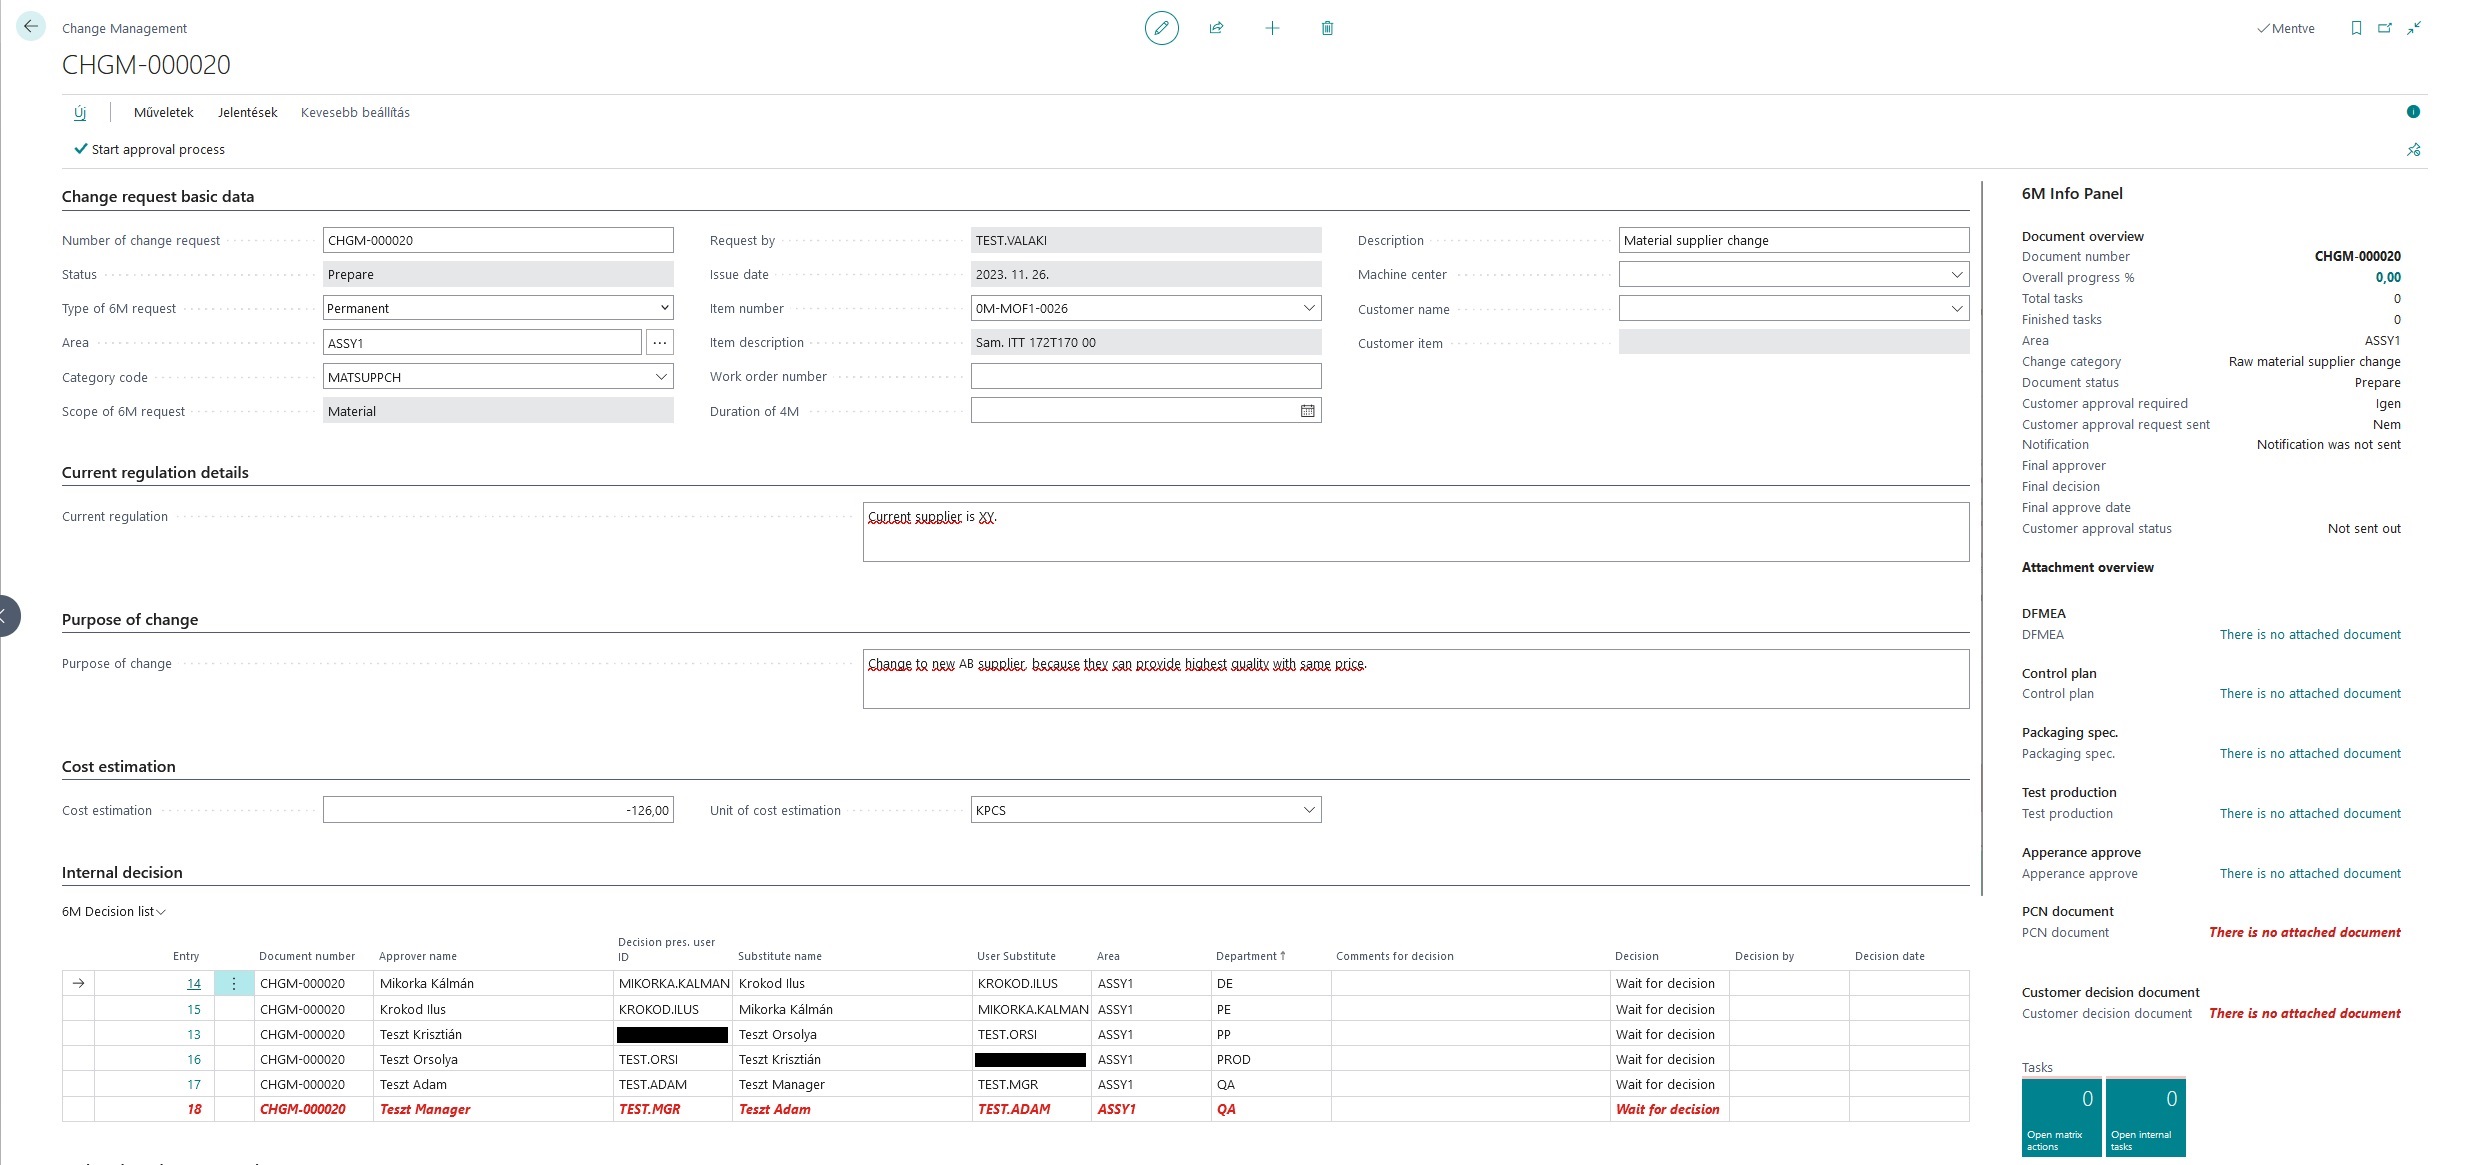
In the above example, we created a document that documents the change of the supplier of a specific raw material. You can see that the decision and task lists are already here, and the content of the info panel has also changed. In this form, the document is still in the "preparation" state, because the decision process must be started by the creator of the document with the "start decision process" button. But before we do that, let's take a look at what's in the info panel on the right:
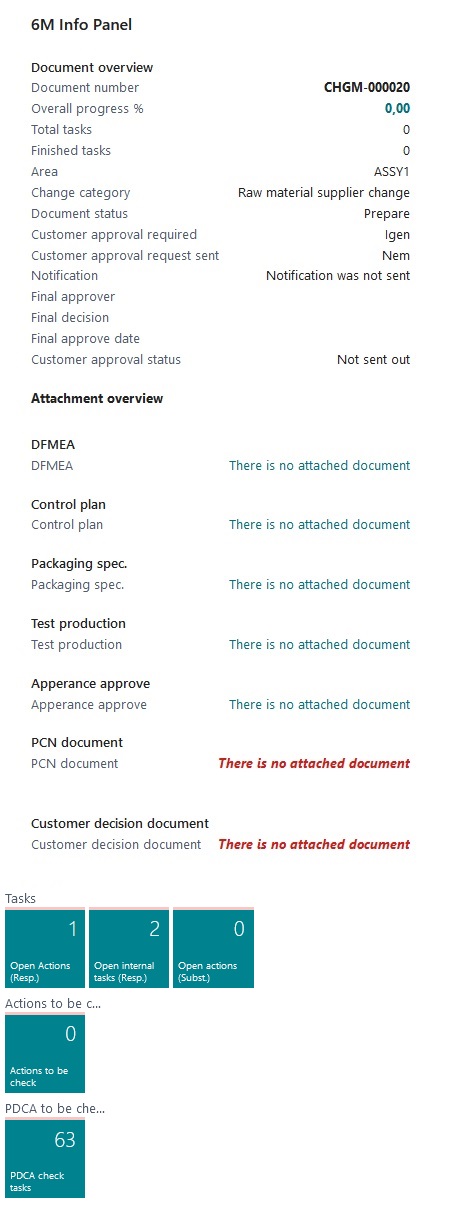
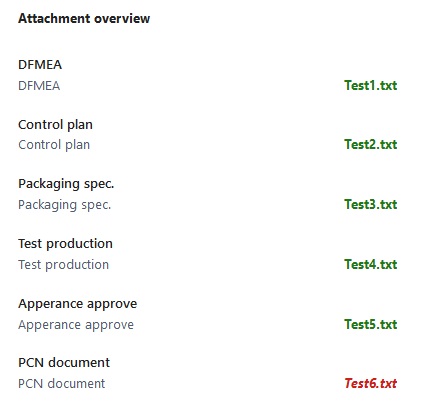
The purpose of the info panel is to provide information about the status of the document. Try to summarize all the data related to the document. Under the document number, you can see the percentage of completion of the document, how many tasks need to be completed and how many of them are ready, you can see which area the document applies to, and the name of the change category is also displayed here. Information can also be obtained about the status of the document, whether the document requires customer approval and, if necessary, whether it has already been sent. It also shows information about whether internal notifications were sent, who was the final decision maker, what decision was made and when. If customer approval is required, we can monitor its status here. Information about the uploaded attachments is also visible. These attachments can be the specifications, measurement results, test reports assigned to the change category in the 6M matrix. In our example, 6 documents will have to be uploaded, a DFMEA, control plan, packaging specification, test production report, appearance approval report and finally the PCN. If these documents have been uploaded, the text "no attached document" will change to the name of the file that was uploaded to the system, and if you click on it in the info panel, you can also download them from the system. If the buyer has responded, his response must also be uploaded, when uploading it can be stated whether the request has been accepted or not. If not, the document will be "closed", if yes, the process can continue. At the bottom are four tiles that open task lists. In the task lists, tasks that have not yet been completed are visible and everyone only sees their own tasks. The numbers on the tiles show the open tasks of that user.
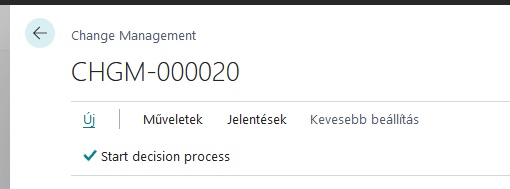
Continue processing the document started above by starting the approval process by clicking on the button shown in the image above. (F2 hotkey can also be used) This will start the approval process. The process may take a little time, because this is when internal notification letters are sent, if they are enabled. After the approval is started, the header, the description of the changes and the cost implications will not be editable. The system indicates the end of the startup with a message. The status of the document will change to "under approval" and the internal approval list will become editable for those who have decision rights.

The next step is to take the document through the internal decision-making chain, i.e. each organizational unit within the given area must make its own decision based on the list shown in the picture below.

The list shows who is authorized to make decisions and who are the substitutes. Only these users can change the decision. The line highlighted in red is the final decision maker. The final decision-maker must make his decision when each organization has made its own decision. If the final decision-maker rejects the document, it will be in the "closed" state. It applies to everyone that it is mandatory to give a reason in case of refusal. When the internal decision list is ready, the task list of the 6M matrix will be available. If it is more convenient for you to edit the decision on the card page, you only need to click on the "item number" and you will reach the page shown in the picture below.

When each organization has made its decision, an internal notification email will be sent to the final decision maker. The complete list looks like this:

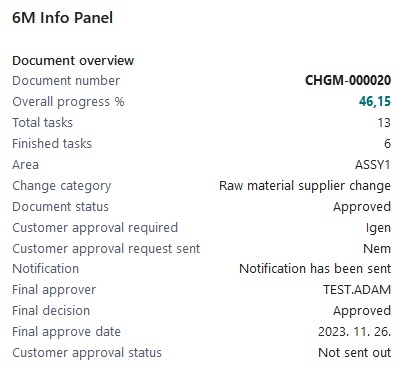
After the final decision, the 6M matrix action list will be available. It can be observed that the deadlines are still empty when the document is created, this is because the system only calculates the deadlines when they become available on the document. The next step is to prepare the documents/tasks defined in the matrix. The initial action list looks like this:

However, before we continue, let's take a look at the info panel...
The next step is to prepare the tasks and documents of the matrix action list. These documents will need to be uploaded under the "attachment actions" menu group. When the user is done with the document, they should upload the document here. Only those menu items relevant to the document are active for uploading, so if, e.g. drawing modification is not required, then the drawing upload menu will be inactive. After uploading, you can track what has already been uploaded and what hasn't yet in the info panel. This menu group looks like this:
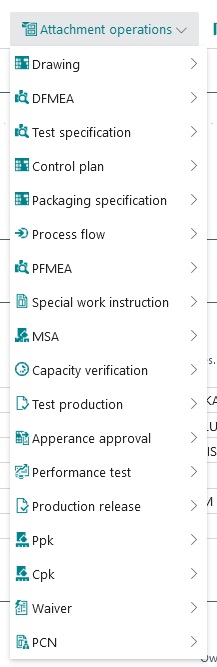
The system will not allow the task to be completed until the appropriate document has been uploaded. There are tasks for which you do not need to upload anything, e.g. operation plan or bill of materials modification. In these cases, there is no need to upload a document in order for the person in charge to prepare it. These cases are:
- BOM modification
- Routing line modification
- New article registration
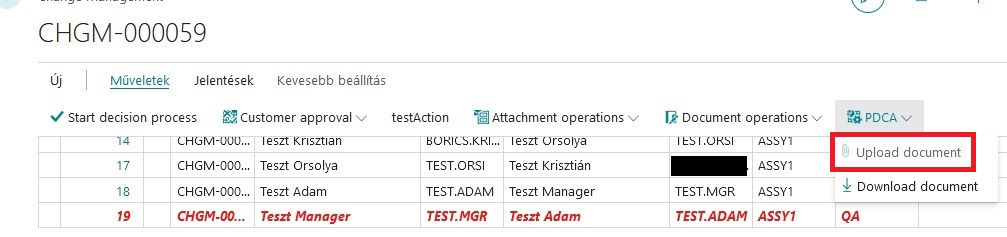
Documents can be downloaded by opening the links. The document that must be submitted for customer acceptance is displayed in red. The 6M matrix action list is as shown in the image below:

The upload speed depends on the size of the file to be uploaded and the speed of the Internet connection, so the upload may take several minutes.
The next point is to check the completed tasks. Anyone who is admitted to the area as a decision-maker is entitled to check, but cannot check their own tasks. Completion of the check must be marked by ticking the marker in the "action checked" column. In the event that the inspector does not accept the completed tasks, you must write your reasons in the "checker's comment" column, then you can reject it with the "reject action" menu from the drop-down menu on the left.
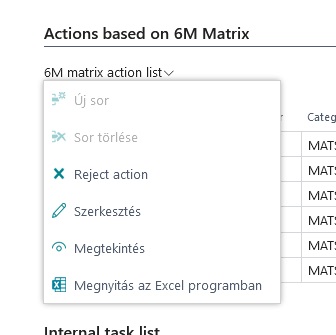
If this happens, the person responsible must perform the relevant task again. The image below shows a rejected task.

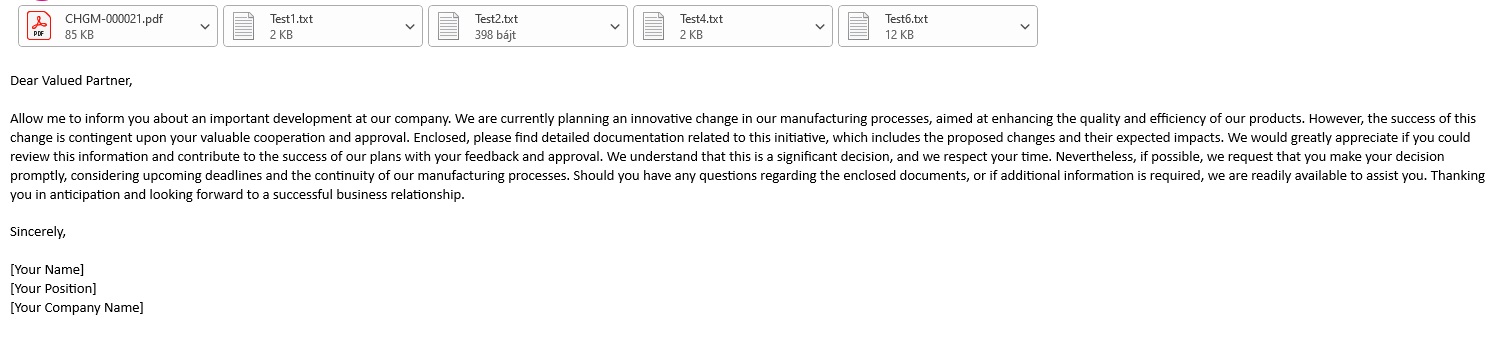
When all tasks have been checked, the approval request can be sent to the customer. This can be done automatically or manually from the app. The customer approval request is a letter that the system compiles from the uploaded documents according to the settings. If manual sending is set, the letter can be sent using the "send approval request to customer" menu. Then our document changes to the status of "under customer approval" and does not allow us to continue until the customer's response is uploaded using the "customer decision document" menu. After uploading, the system asks for the result of the customer's decision, and then sets the status of the document accordingly. It is very important to be careful at this point, because if the system closes a document, it cannot be restored and the whole approval process must be restarted. The approval request looks like this:
If a positive response is received, the internal task lists will be available, if the person in charge completes them, the document will be in active status. In case of a negative answer, the document is closed. The finished internal task list looks like this:

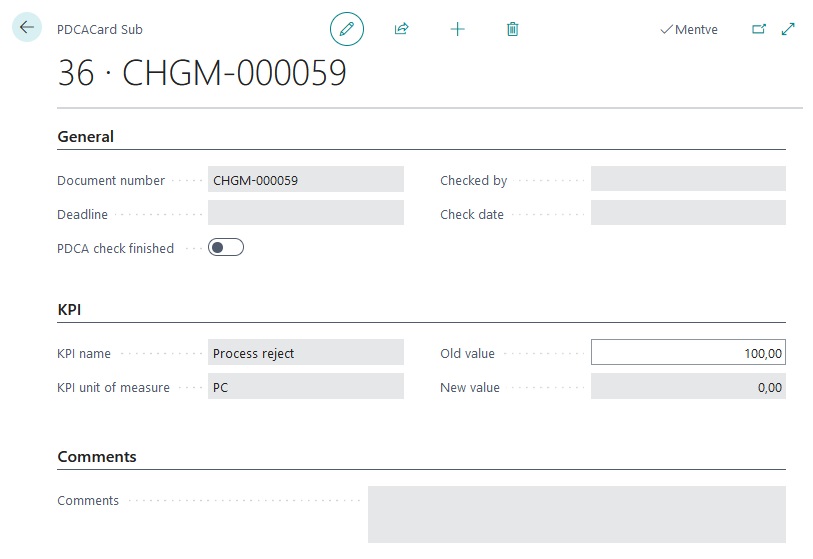
PDCA Check
This list is used to check the effectiveness of the introduced change. When creating each new document, according to the KPI specified in the settings, the system creates a checklist that looks like this:
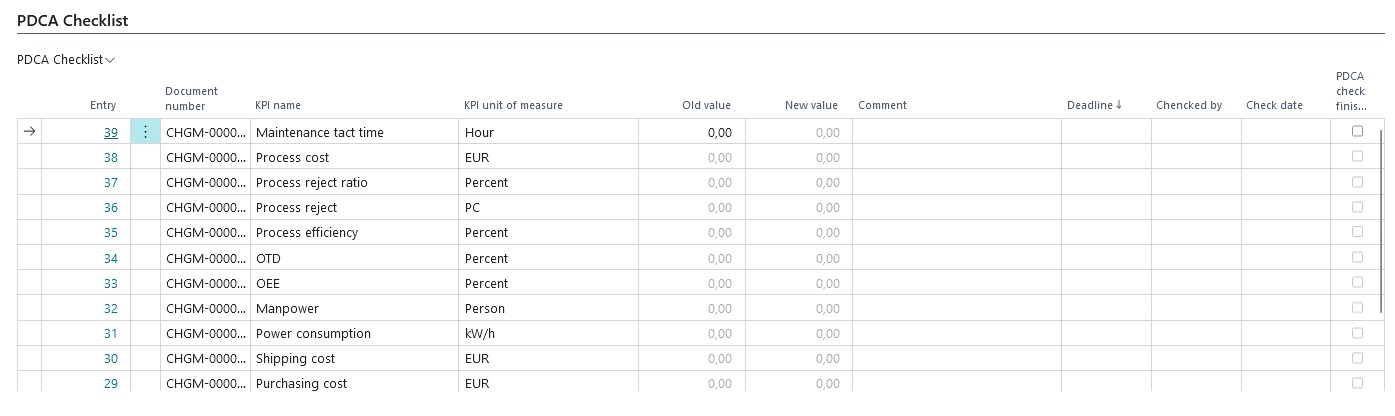
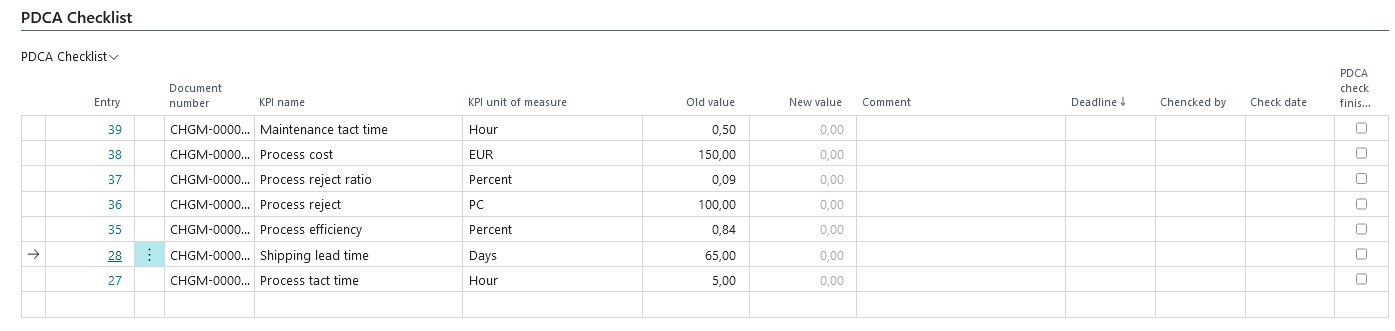
As long as the status of the document is not "active", you can enter the values of the selected KPIs before
the change in the "old value" field.
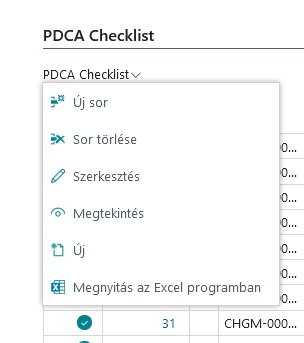
It turns out that you will not use all KPIs during the check, in which case you have the option to delete
the unused ones until the status of the document is "active". The delete function is available from the menu
next to the PDCA checklist label.
Document operations
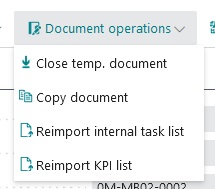
Closing a temporary document
With this menu item, expired temporary documents can be closed.
You have the option to do this task automatically, if you enable this function in the settings, the system will automatically close expired documents.
Copy a document
You can make a copy of any document. To copy, use the "document actions" "copy document" menu. This feature is useful when you need to launch multiple change requests that are only slightly different. The copied document will have the status "prepare" and must be handled as already mentioned.
Internal task list re-import
With this menu item, you can re-import the internal task list.
The import will delete all data from the existing task list!
KPI list re-import
You can import the KPI list again with this menu item.
The import will delete all data from the existing KPI list!
Task lists
The purpose of the task lists is that the logged-in user can easily check any tasks. The task lists are available from the info panel of any change request document or from the following role main pages:
- Processing sales orders
- Accountant role main page
- Machine Operator Role Main Page
- Production planner role main page
- Project manager role main page
- Procurement manager role main page
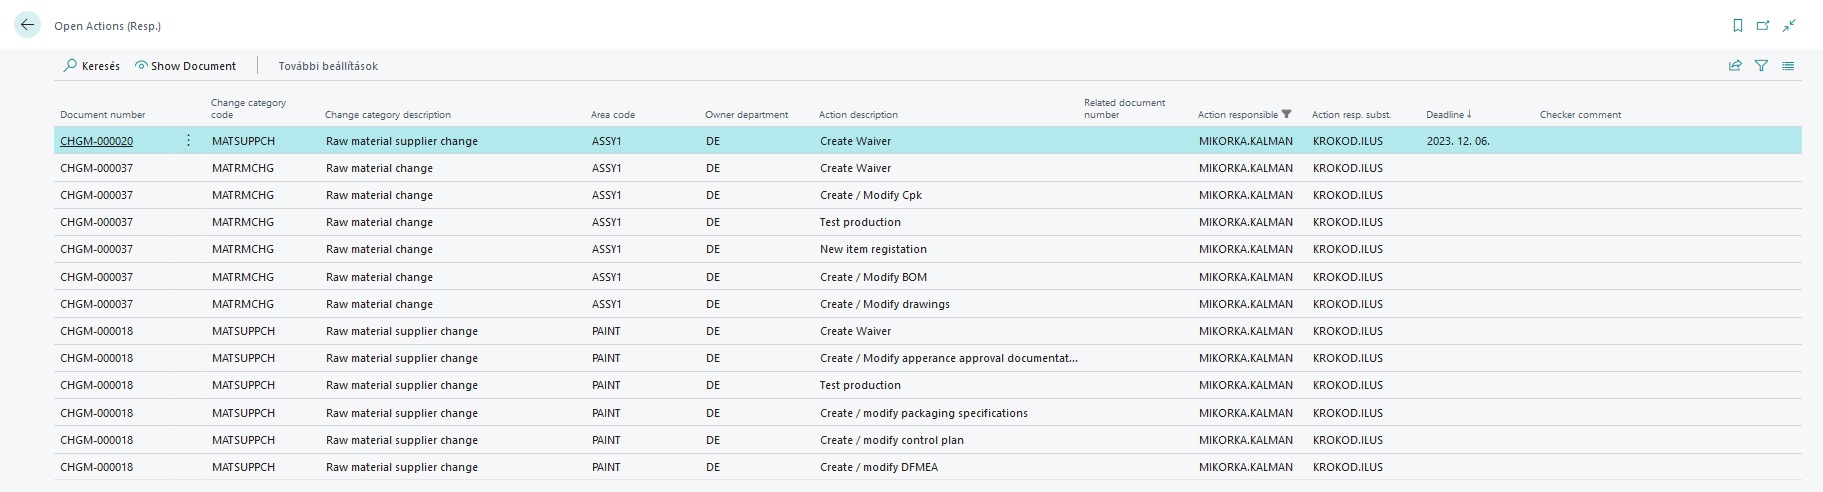
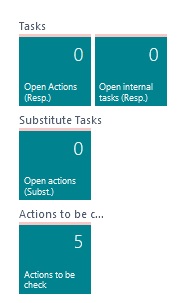
- Open actions (Responsible) -> This list shows the tasks defined in the open 6M matrix, where the given user is listed as responsible for the task. The list also includes items without a deadline.
- Open internal tasks (Responsible) -> This list contains open internal tasks. The list also includes items without a deadline.
- Open actions (Substitute) -> This list shows the tasks defined in the open 6M matrix, where the given user is listed as a substitute for the task. The list also includes items without a deadline.
- Actions to be checked -> This list shows the list of actions waiting to be checked. (This list is not filtered by user, because the only condition for checking is that the user is registered for the area.)
- PDCA Checklist -> The list of unfinished PDCA checks can be seen here. Only items with deadlines are displayed.
There may be cases when there is no deadline in the list yet. This is because the system calculates the deadline when the given task list becomes available in the change request. This means that the change requester is not yet in the state where the current task list is available. We can see such an example in the picture below.
Task lists on info panel
The above task lists can be accessed using the tiles on the info panel:
Reports
Three reports are available under the reports menu group, the first one enables the document to be printed, the second one prepares some statistics on change requests for the specified period, and the third one allows the user to print a summary of settings. Each setting shown here summarizes the entered tasks, change categories, areas, organizational units and registered users in a table. The printed copy can be helpful when using the app.